Seasons Greetings

December 24, 2013


Happy Holidays, to all my blog friends! 

And sincere thanks for your

support
and
friendship

throughout this past year.
 
You helped make it a happy one in so many ways. 
 
Here's to another great year ahead, for all of us!

xoxo


It's a Wonderful Life and Reindeer Love

December 19, 2013


Like many of you, in light of the rapidly approaching holiday, I plan on taking a blogging break. But before I do, I just wanted to share with you two of my all-time Christmas favorites. The Christmas movie "It's a Wonderful Life" has really been my favorite movie of all time for many years running now. And as reindeer have become ever-so-popular over the past year or so I have grown to love them, too.

Just so happens that I found this awesome Christmas chalkboard printable (another one of my obsessions loves) over at Simply Kierste and just had to use it in my home decor this Christmas.
 
it's a wonderful life chalkboard printable | simplykierste.com
 {Please go to Simply Kierste directly to get the free download.} 

I set it up in a simple white frame on some burlap along with two incredibly sparkly reindeer heads I picked up for half price at Jo-Ann's.  Every time I see them my heart skips a beat.  Really.  I absolutely love them.


Isn't she lovely?  Yes, I've decided she's a she.


Right now I have these beauties on my mantel along with strands of lights and candles, but it's too hard to get a decent picture there so I created this vignette to show them off properly.

Now I'm off to take care of more pressing things, like wrapping presents and baking goodies.

Hope you liked my reindeer!  And if you haven't already, be sure to catch "It's a Wonderful Life."  Sometimes all we need is a sappy old movie to remind us that it is indeed just that, a wonderful life.

Merry Christmas, friends!

xoxo

Easy DIY Christmas Countdown Calendar

December 14, 2013


Okay, so it's not 14 days 'till Christmas.  It's {gasp} only 11!  But I took these photos the other day when it WAS 14 days away.  Where has the time gone?  Seems like yesterday it was Halloween! Anyway, the reality is that it's right around the corner.  But that doesn't mean you can't still make your own Countdown Calendar if you haven't already, thanks to your Target Store dollar bin.  My Target still had these yesterday!
 

They're the cutest chalkboards, already printed with the words "Christmas Countdown." They actually had a few different styles. I chose this one because I liked the retro look (okay, and the polka dots, too!).  You can just hang them as is, or make them a part of a bigger display, which is what I chose to do.  Right here it's  propped up on my vintage Skotch cooler that I picked up for a song at Goodwill last Christmas.

I had this DIY chalkboard laying around since my craft show back in September, so I thought I'd put it to good use.

I just hung the calendar on it, and added a vintage red glass ornament, a la Goodwill.
 
 
I was so happy to score these ornaments I can't even tell you.  I think a box of them was $1.49.  I thought it needed a bit more vintage flair, so I added the ubiquitous elves.  I don't know if you remember these, but I sure do!  Everyone had these when I was growing up.  (I had to borrow them from my daughters ~ thanks, girls!)


Okay, so they can be a little creepy.   But I still think they're fun!


I used small stencils to chalk in the number.  Can't believe I have to change it to 11.  Oh, and the HoHoHo is from the Target Store dollar bin, too.
 
So, are you ready?
 
Decorations done, cookies baked, presents wrapped?
 
Don't worry, there's still no plenty of time left!
 
I'm counting on it.
 
I do hope you'll stay connected and follow me via Google Friends Connect, Bloglovin' or e-mail subscription (all in my sidebar) if you haven't done so already.

CLICK ON ONE OF THESE:)

And I'd also love to see you follow Charm Bracelet Diva {at Home}'s Facebook, Pinterest and Twitter pages, too! Just click on those really pretty-colored icons above:)

Don't miss another thrifty DIY home decor post!
 

xoxo
 

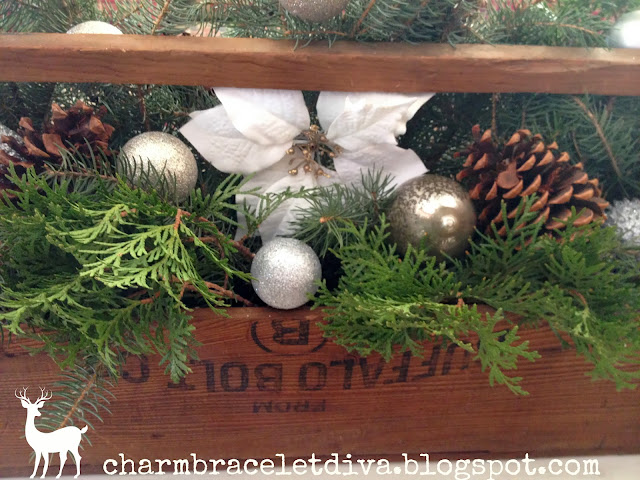
Natural Christmas Styling: Vintage Wooden Tool Box with Fresh Evergreens

December 9, 2013

vintage wooden tool box ornaments evergreens Christmas centerpiece

You don't need to spend a lot of money to create an inviting Christmas vignette.  Seriously.  I'm so grateful that today's holiday decorating trends have swayed more toward using natural elements rather than store-bought items. Couple that common sense thriftiness with some Dollar Store add-in items and you've got a truly affordable, beautiful Christmas display that you and your family can enjoy throughout the entire holiday season.

Tips for Styling Christmas Cloches

December 5, 2013


Welcome back!  I hope you all had a great Thanksgiving with family and friends.  I know I did.  Speaking of friends, I want to say welcome to all of my newest followers!  It's great to have you join us here at Charm Bracelet Diva {at Home}.  I'm so glad you're here!

Now I want to share with you a really easy way to add some Christmas cheer pretty much anywhere in your home.  Remember in my last post where I mentioned that I was obsessed with cloches filled with sparkling Christmas balls like these?


Well, there are many ways you can decorate with cloches and glass containers.

I started with this one tiny cloche. 
 
And it kind of snowballed from there.
 
Do. Not. Judge.

Mmkay?

WHAT TO USE AS FILLERS

For starters, one great and easily-acquired cloche filler around Christmas time is any type of natural elements you can gather up. 
 

Here I chose pine cones and evergreen cuttings from our property, but you can also use mossy items, twigs, shells, coral and any other natural elements you can think of for more of a rustic holiday look.  This cloche was one of my favorite Goodwill finds to date: $6.99 for a Smith & Hawken $35.00 garden cloche.  Score.

Vintage plays a big part in my holidays (surprise, I know, right?).  And here's a fine example of that.


I already shared some of my other Target vintage-style pick-up truck ornaments with you here.  But I had to add another one to this very delicate cloche on a pedestal.  It's one of my favorite cloches. I got it at the Kane County Flea Market a few years ago.  Any small, vintage Christmas decorations can be displayed in a cloche like this.

Staying in line with the vintage look, I filled this one with vintage glass ornaments I inherited from my mom, along with some others I've picked up at flea markets over the years.


I know this one's technically not a cloche, per se, but it's pretty darn close so I've included it in my collection.  It's from Pottery Barn.  I actually won it in a blog giveaway you can read about here.  I placed the ornaments on a bed of faux snow to protect them from any unwanted jostling.

And finally, here's a tiny cloche I really love.  It's normally home to one of my ceramic owls that you can read about here.


WHERE TO BUY THEM

Now that you know what you can put in the cloches, you're probably wondering where I get all my cloches.


Again, no surprise there.  And as I mentioned above, the $6.99 Smith & Hawken cloche I recently scored at Goodwill is one of my all-time favorite scores to date.  Depending on where you live, Goodwill may or may not be a great place for you.  Just make sure you shop early and often, since there's a big turnover of merchandise at these stores.  Also, keep an eye out at any of your local thrift shops and flea markets.  If you see one, don't hesitate, just grab it because they don't last for long!
 
HOW TO FILL THEM
 
Okay, this may seem like a no-brainer to some people, but I thought I'd mention it anyway.  To fill a cloche with something like ball ornaments, just turn the cloche upside down and fill it from the top down.  Once you have it filled just the way you want it, place the plate or pedestal over the bottom opening and gently flip the cloche right-side up.  Voila.


I might even have more cloches (remember, no judging) but a girl's gotta stop somewhere. All in all I guess I filled enough cloches for one Christmas holiday, don't you think?
 
So what do you put in your cloches?
 
I do hope you'll stay connected and follow me via Google Friends Connect, Bloglovin' or e-mail subscription (all in my sidebar) if you haven't done so already.

CLICK ON ONE OF THESE:)

And I'd also love to see you follow Charm Bracelet Diva {at Home}'s Facebook, Pinterest and Twitter pages, too! Just click on those really pretty-colored icons above:)

Don't miss another thrifty DIY home decor post!
 

xoxo
 
Related Posts with Thumbnails